| |
|
|
| |
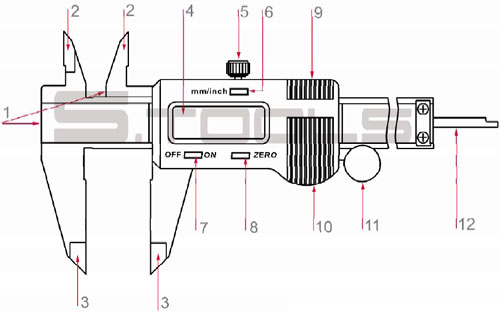
1. Step measuring faces
2. Internal measuring faces
3. External measuring faces
4. LCD readout |
5. Locking screw
6. "mm/inch" button
7. "ON/OFF" button
8. "ZERO" button |
9. RS232 output port
10. Battery cover
11. Thumb wheel
12. Depth measuring bar |
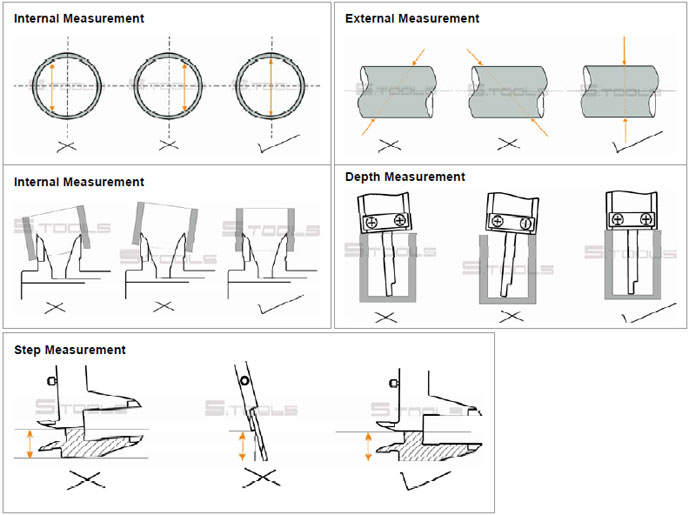
1. Clean measuring faces before use.
2. Remove cutting chips, dust, burrs and other foreign substances from the piece to be measured.
3. Buttons:
- "mm/inch" button is for mm and inch conversion at any slider position.
- "ON/OFF" button is to turn on or off power.
- "ZERO" button is for origin starting zero point setting at any slider position (setting the reading on display to
be zero).
4. Caliper should be checked before each use to make sure that it is properly zero set. The reading should be
zero when the external jaws are closed, otherwise press "ZERO" to set zero reading. Open and close the
external jaws to verify if reading returns to zero.
5. Measurement:
6. One battery will last for one year of continuous use. If there is nothing on the display or the digits flash,
battery voltage is too low, please replace battery (the positive side of the battery should face out). If digits
do not change when buttons are pressed or vernier is moved, take out battery and put it back after 1
minute. Remove the battery if the caliper is not going to be used for a long period of time.
7. Always apply constant force on thumb wheel during measurement and zero setting.
8. Tighten locking screw to hold reading.
9. Working temperature is 0-40ºC. Do not put caliper near strong magnetic field. Keep caliper dry, liquid getting into
the caliper will damage electronics. Do not apply voltage on caliper like engraving with electric pen.
10. Measuring faces should be carefully protected from being scratched or damaged. Do not operate abruptly, drop
or strike caliper. | |
|
|
|
|
|